
Follow this guide to learn about connecting to the Wi-Fi networks on your Android phone.
Contents
How to Connect to Wi-Fi Networks on Android?
You can connect to Wi-Fi networks on Android:
1: How to Connect to Wi-Fi Networks from Settings of Android?
In Android, you can connect to the Wi-Fi by visiting “Settings”. For that instance, you need to try out the procedure stated below:
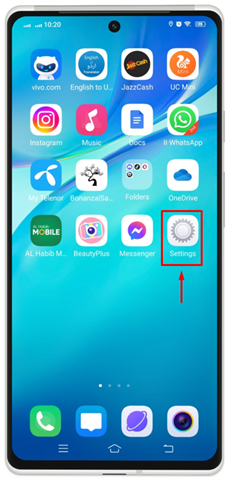
Step 1: First, navigate towards the “Settings” app on your mobile phone.
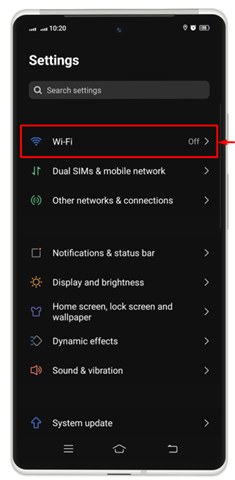
Step 2: Now, hit on the “Wi-Fi” settings.
Step 3: To turn on the Wi-Fi, swipe the slider towards the right.
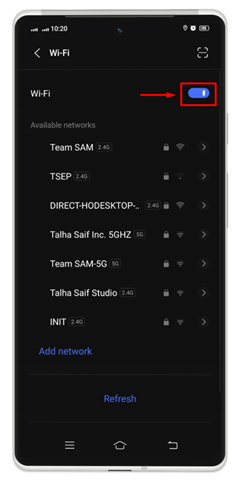
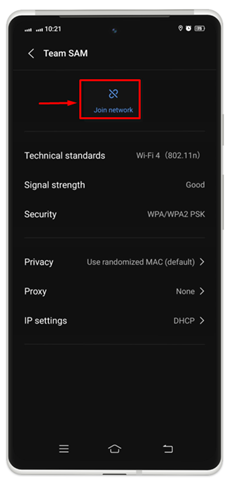
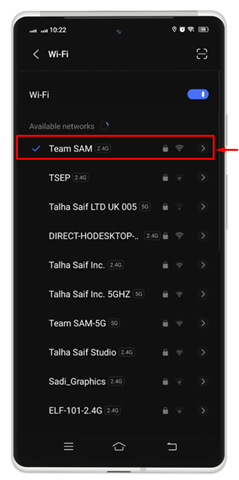
Step 4: Then, you will see all available Wi-Fi networks. Search for the network name you wish to connect to and hit on it. On the screen being displayed, tap on the “Join Network” option.
Step 5: Here, you have to enter the correct password for your network and tap on the option “Connect” there.
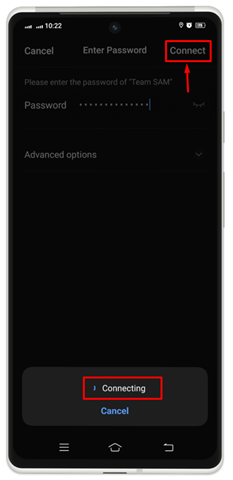
You will see “Connecting” notification until your device is connected to the network.
Step 6: Once you are done, you will see a checkmark or indicator of the Wi-Fi network with which you are connected.
2: How to Connect to Wi-Fi Networks from the Control Center of Android?
You can also connect to the Wi-Fi network from the shortcut center or control center of your Android phone. For practical demonstrations, check the steps stated below:
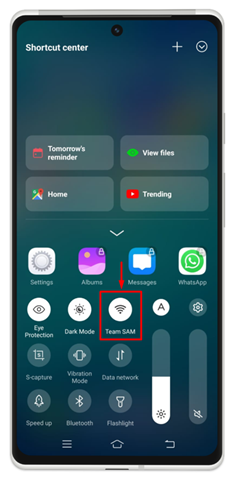
Step 1: Swipe accordingly on your device to launch a control center on the screen and then, tap on the “Wi-Fi” icon.

Note: On most Android phones, you have to swipe from top to bottom, while on some mobile phones, the control center appears when you swipe from bottom to top.
Step 2: If you saved the password for a network when you previously connected to it. It will automatically join that network.
Note: If you have not joined any network, then press the “Wi-Fi” option. You will be directed toward the Wi-Fi settings. Then, follow the steps of the previous section from step 3 onward for connecting to a Wi-Fi network.
3: How to Connect to Wi-Fi Networks by Scanning QR Code
You can also scan the QR code for the Wi-Fi network to connect automatically, without having to enter the password. Almost all latest Android phones supports this feature, and you can connect your Wi-Fi quickly through QR code scan by using the following steps:
Step 1: Navigate toward the “Settings” app on your mobile phone.

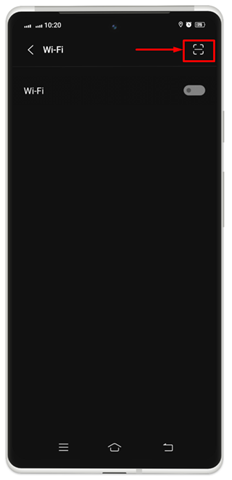
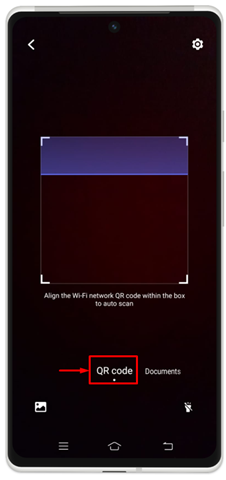
Step 2: Open “Wi-Fi Settings” and from the top right corner, click on the QR Code symbol for Scanning.
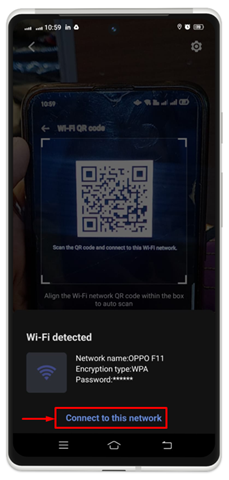
Step 3: Now, from your Wi-Fi device or any other device that is connected to the same network that you want to connect to, open the QR code and scan it with your device.
Step 4: Once the scanning is completed, click on “Connect to this network”.
Conclusion
This post provides precise and accurate guidance on how to connect to a Wi-Fi network on an Android mobile phone. Three methods are provided here: connecting to a Wi-Fi network from the settings, directly from the control center, or scanning the QR code for the Wi-Fi network. All of these methods are presented in a step-by-step guide here.